
2026年3月更新

WordPressにGoogleカレンダーを設置する方法として人気のライブラリ『FullCalendar』。
しかし、設置しただけでは表示に物足りなさを感じることも。
そこで『FullCalendar』v.6をCDNで使用する方法とカレンダーカスタマイズ方法を解説するとともに
プラグイン『Simple Custom CSS and JS』についても解説します。
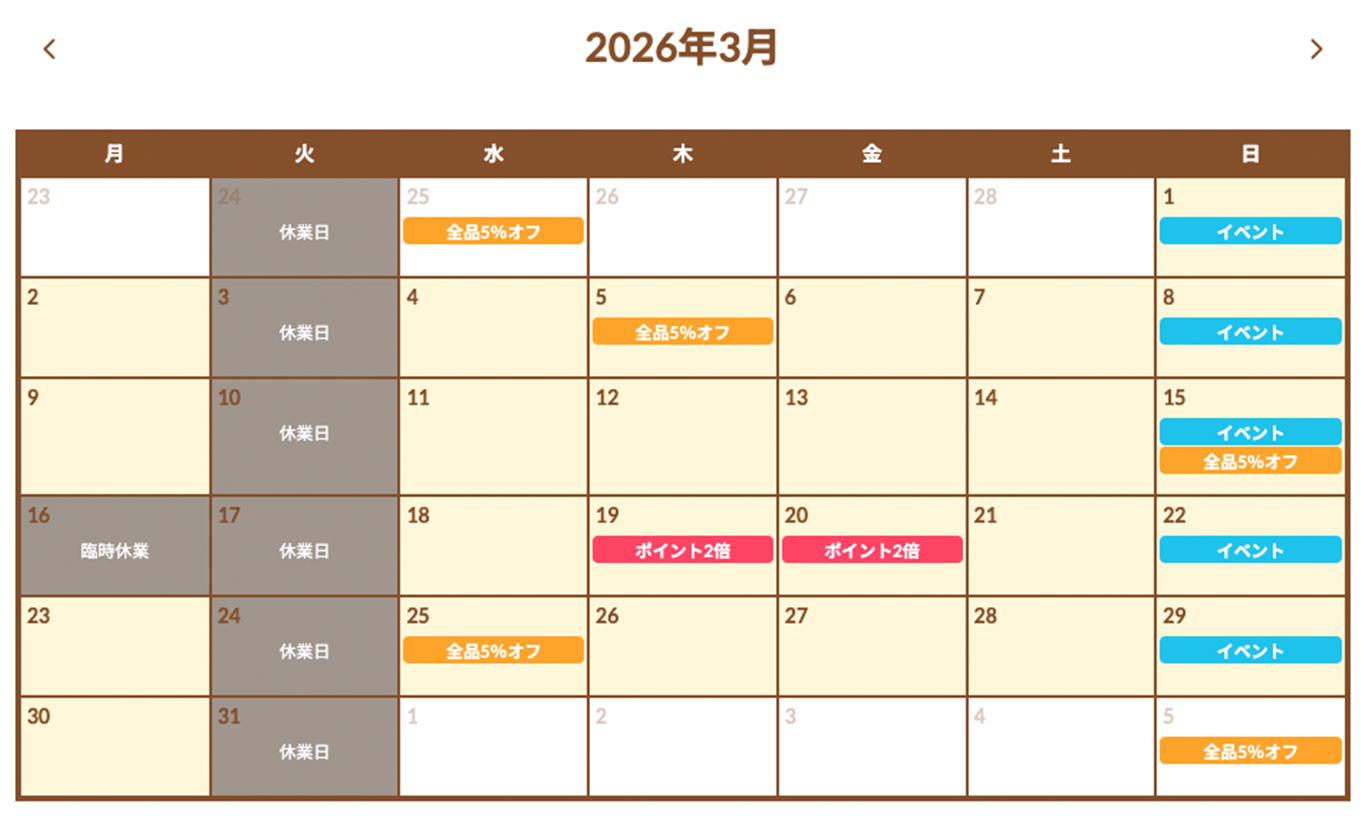
解説どおりに設定すると、表示例(小売店を想定)のようなカレンダーが設置できます。
■表示例
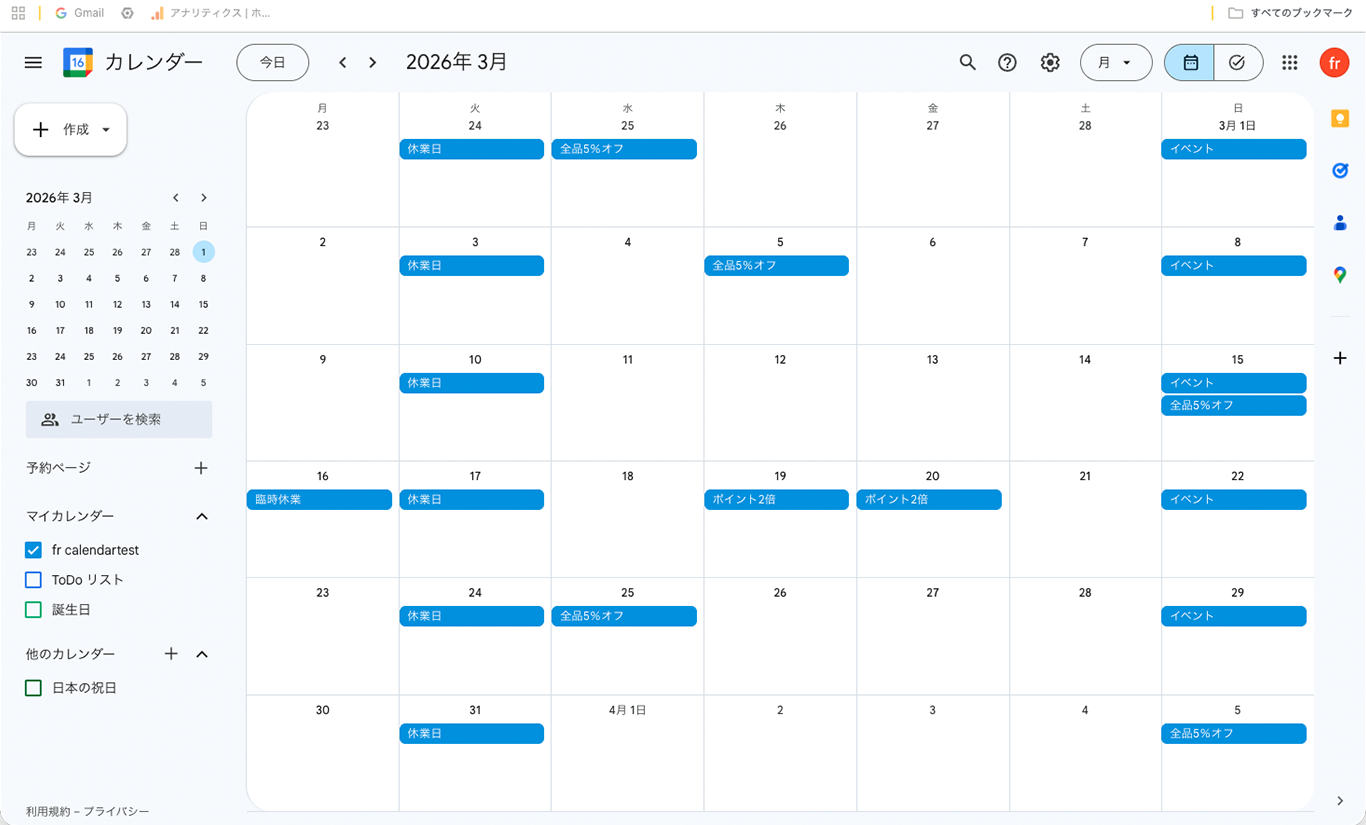
■Googleカレンダー画面
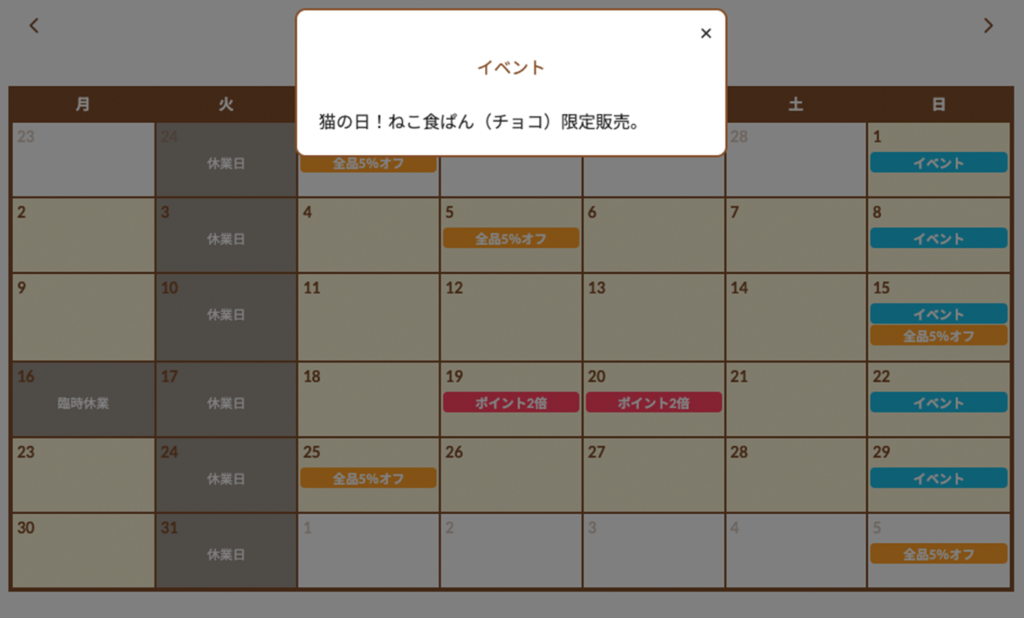
■イベントクリックでモーダル表示
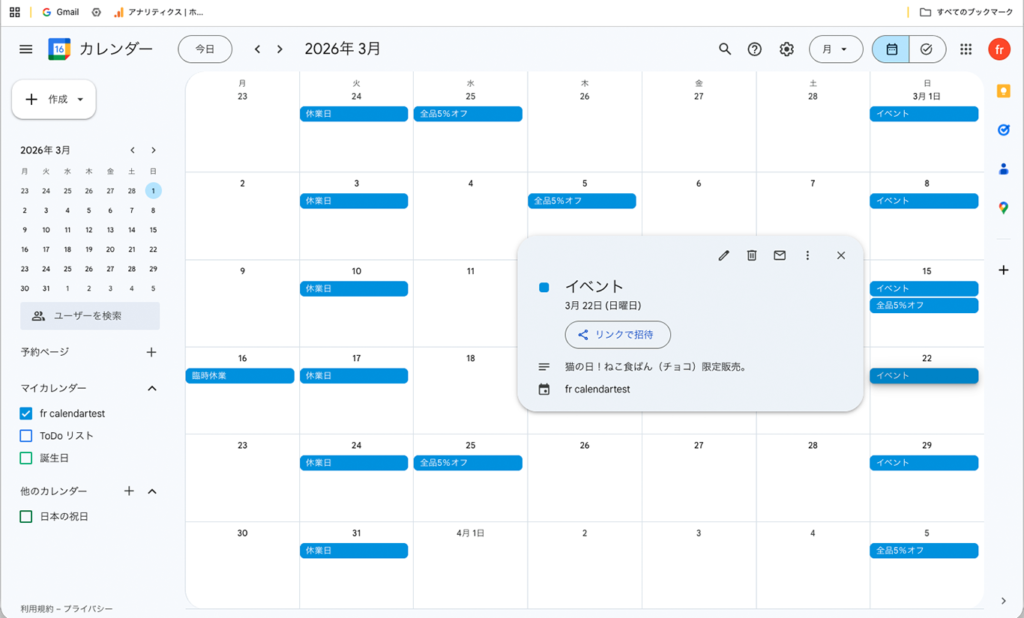
■Googleカレンダーイベント詳細
Googleカレンダーの設定
まずはWordPressに表示したいカレンダーを設定します。
カレンダーを選択
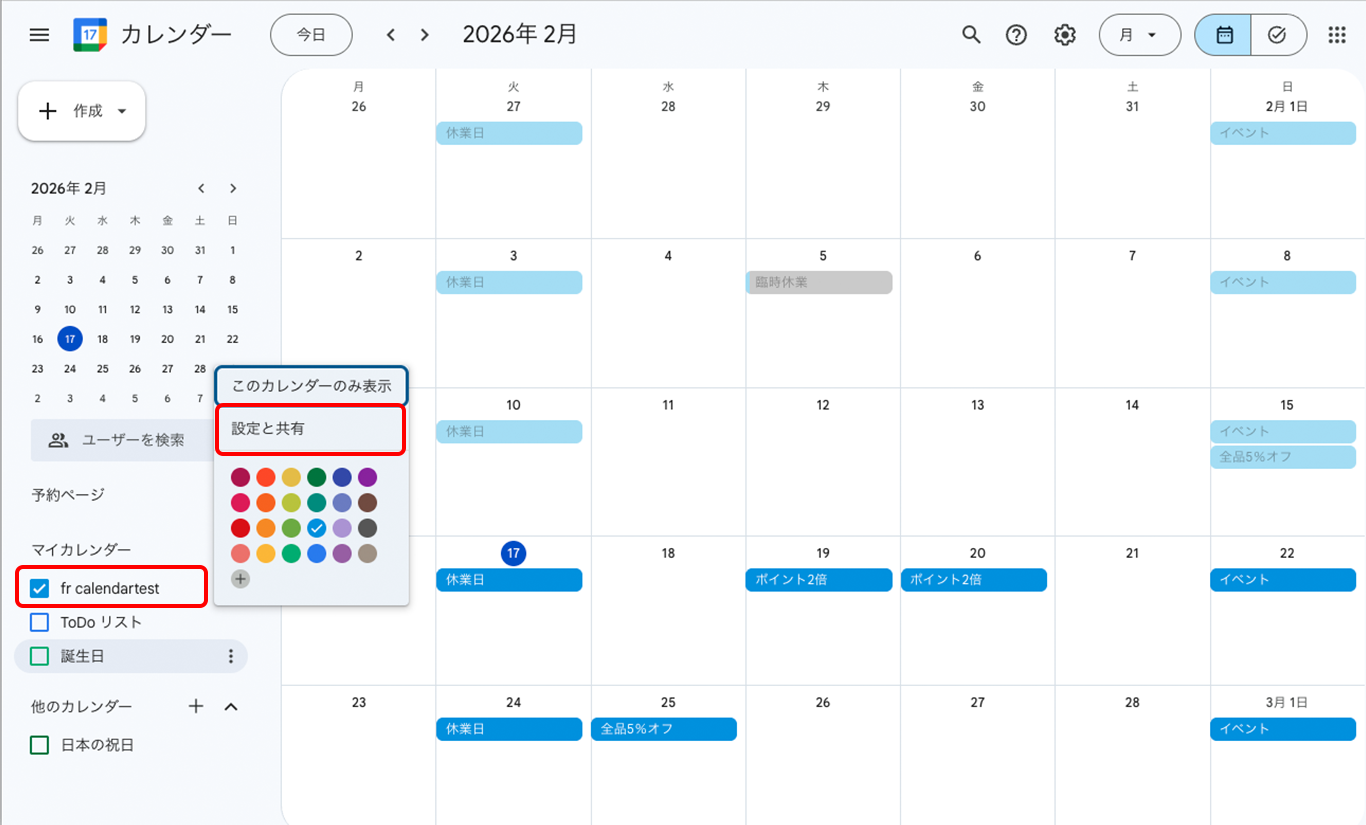
Google Calendar を開き、
左メニューから設置したいカレンダー名の設定ボタンをクリック、
現れたウインドウの設定と共有をクリック
カレンダーIDの入手
左メニューの
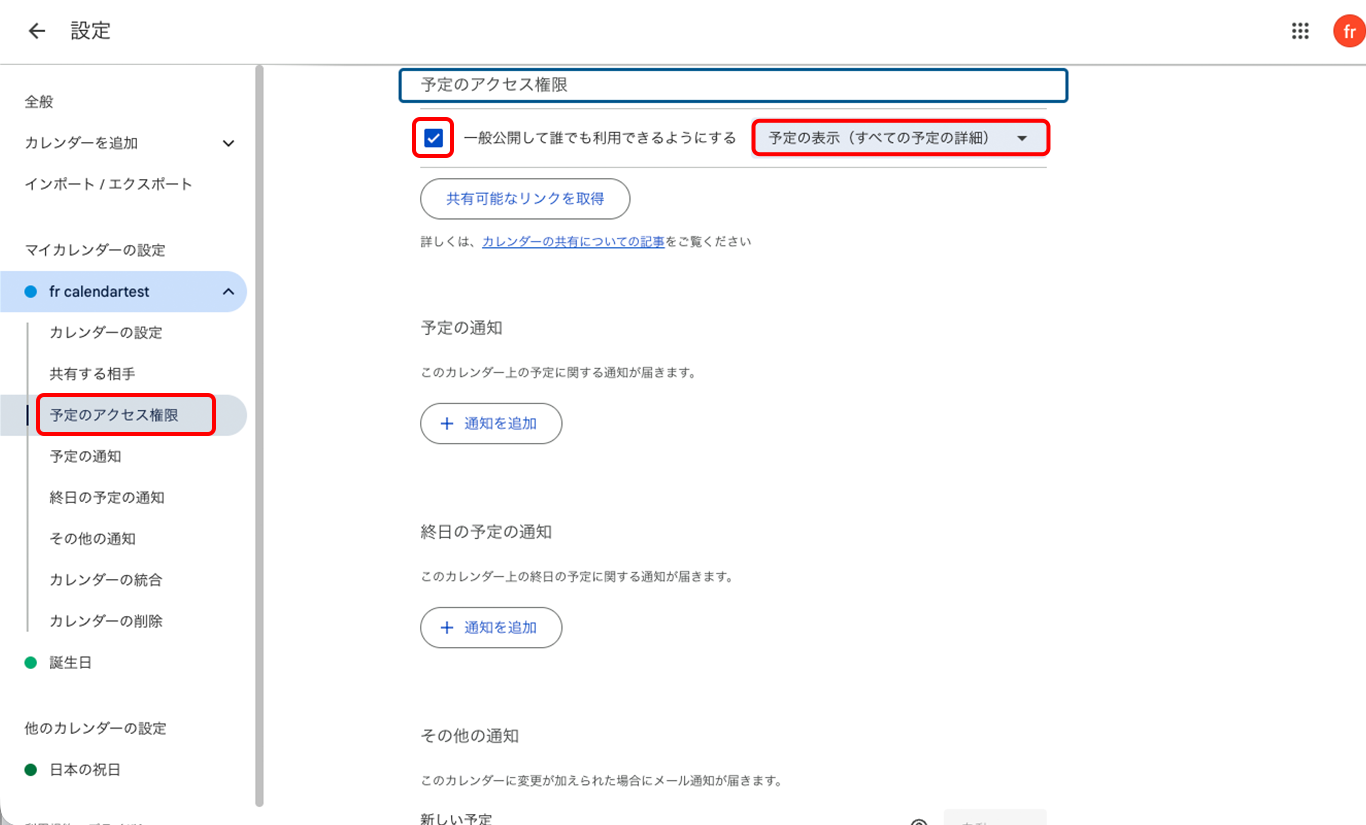
予定のアクセス権限をクリック、
一般公開して誰でも利用できるようにするにチェック、
右のタブメニューから予定の表示(すべての予定の詳細)を選択します。
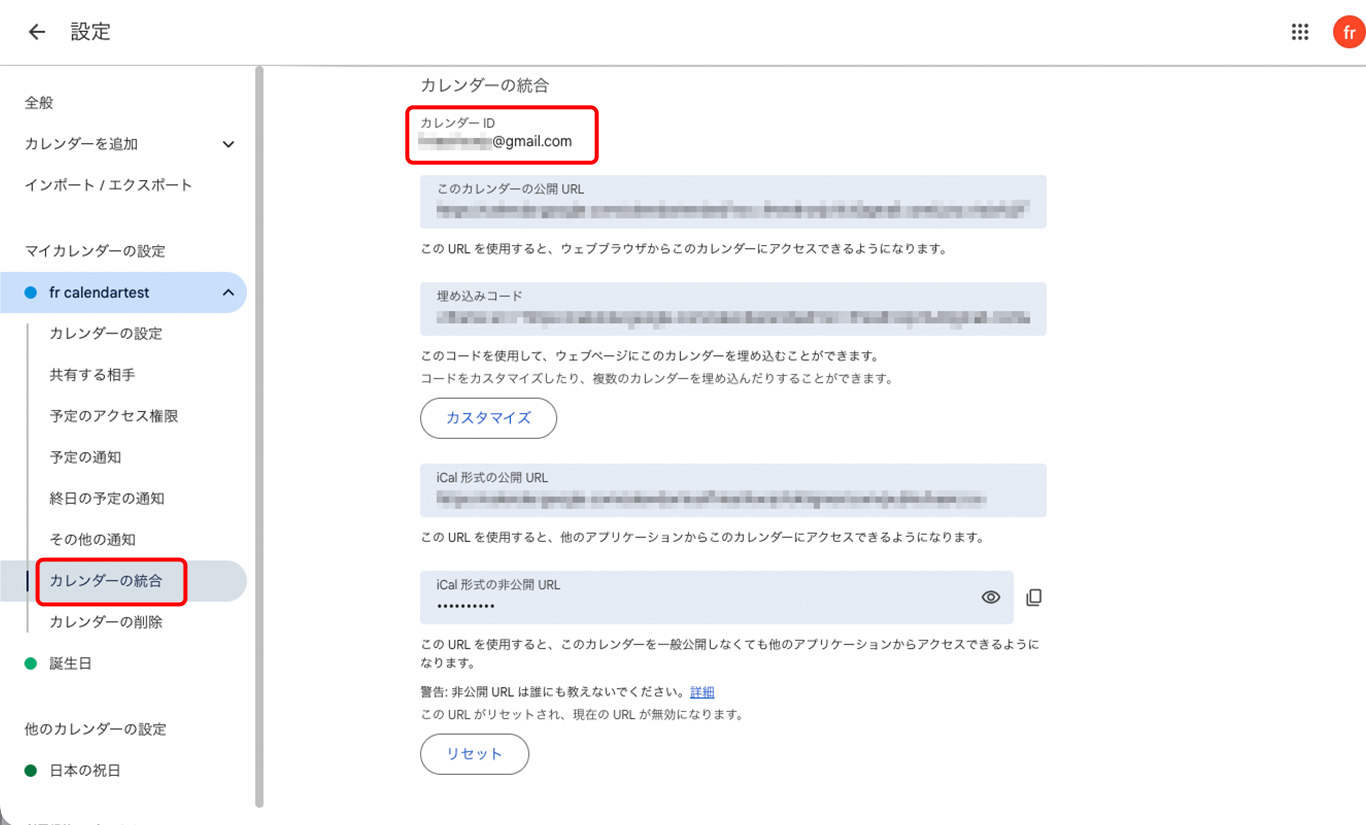
カレンダーの統合→ カレンダーID をコピーしてください。
以下もコピーする作業があるので、メモ帳やテキストアプリなどに一時的に記入しておくのをオススメします。
Google Cloud Platformの設定
Google Cloud PlatformのAPIキーを入手します。
Google Cloud Platform プロジェクト作成
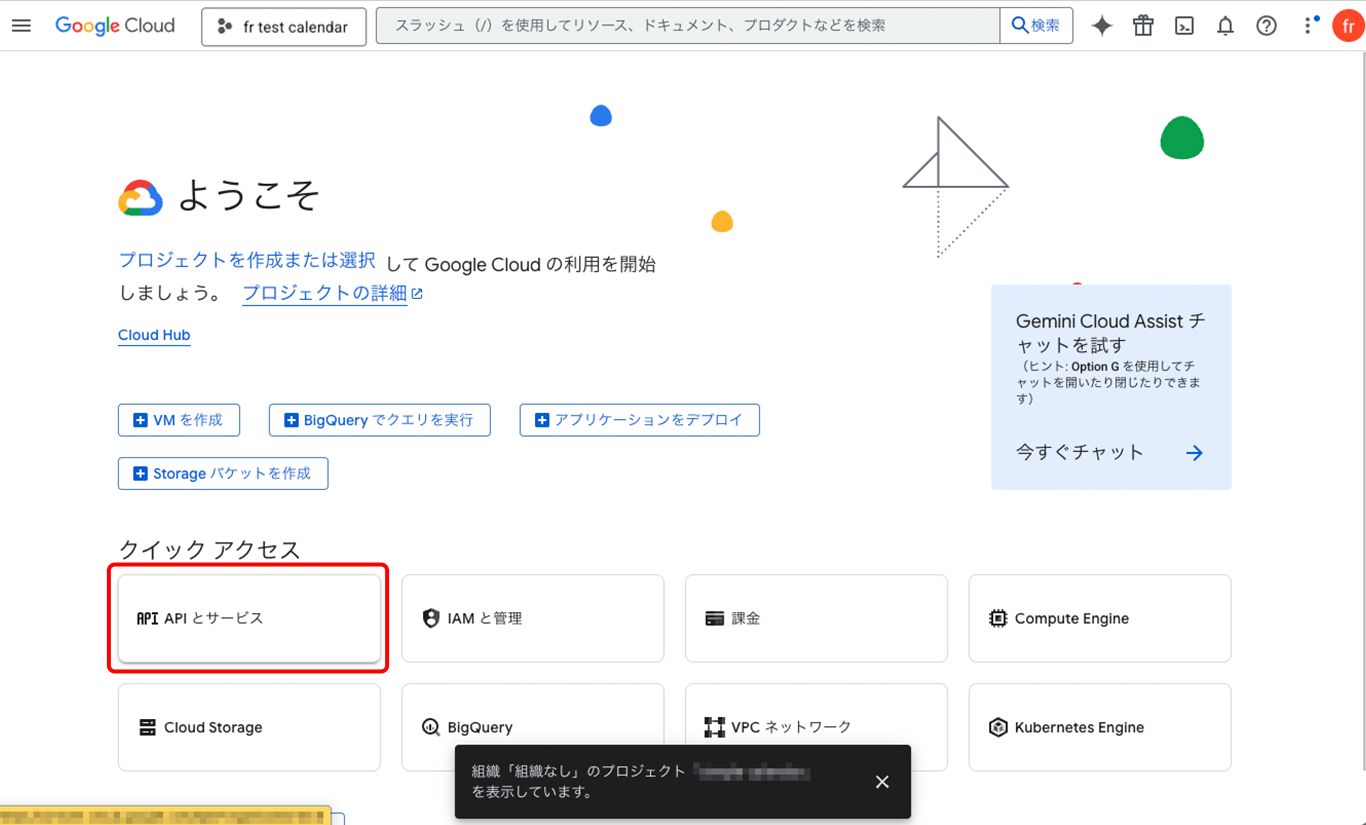
Google Cloud Platform https://console.cloud.google.com/ にアクセスし、
上メニューのプロジェクトの選択ボタンをクリックします。

プロジェクトの選択ウインドウが開きます。
ウインドウの右上新しいプロジェクトをクリックします。

新しいプロジェクト画面に遷移します。
プロジェクト名をつけ、下の作成ボタンをクリックします。

APIとサービス設定
「ようこそ」画面へ戻ります。
APIとサービスボタンをクリックします。
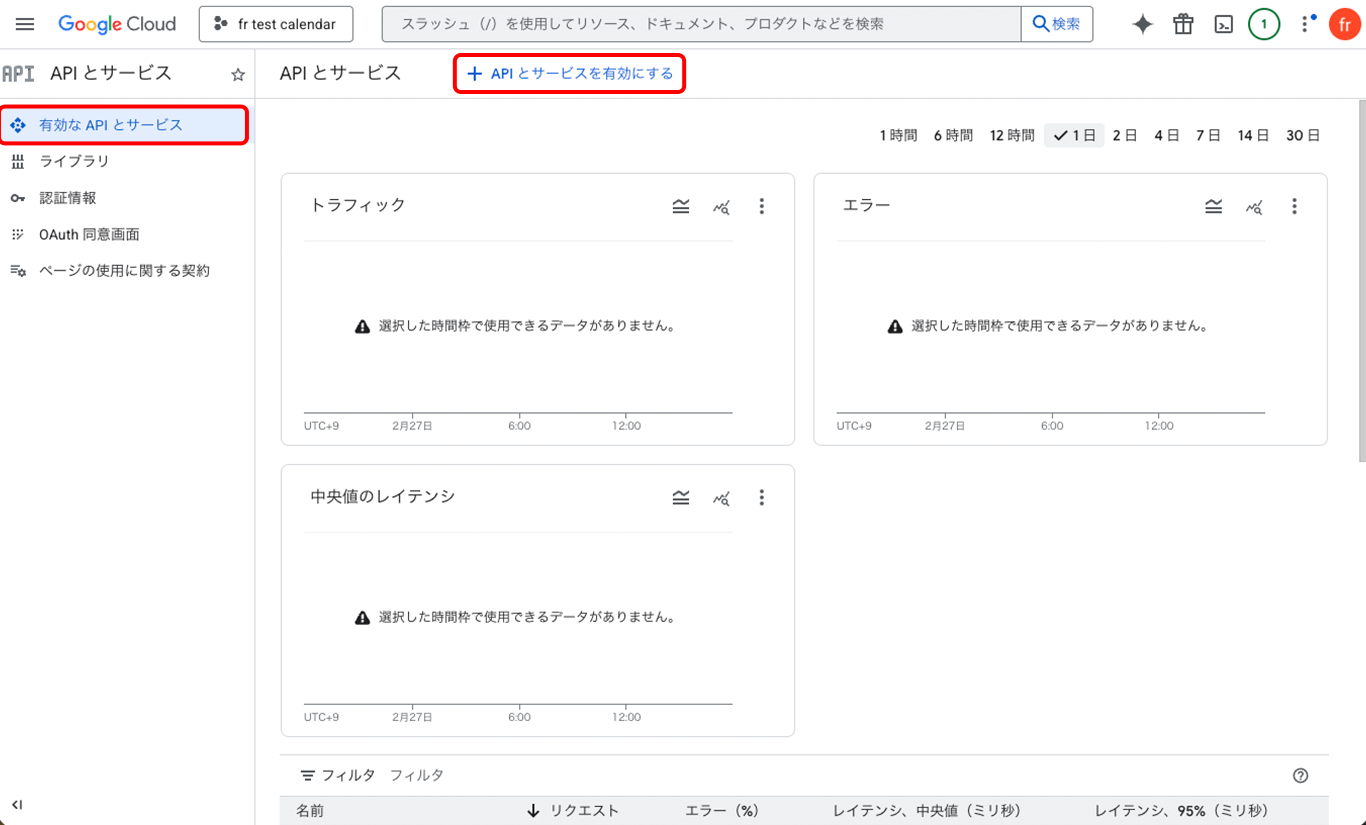
左メニューから有効なAPIとサービスを選択し、
画面上側の+APIとサービスを有効にするをクリックします。
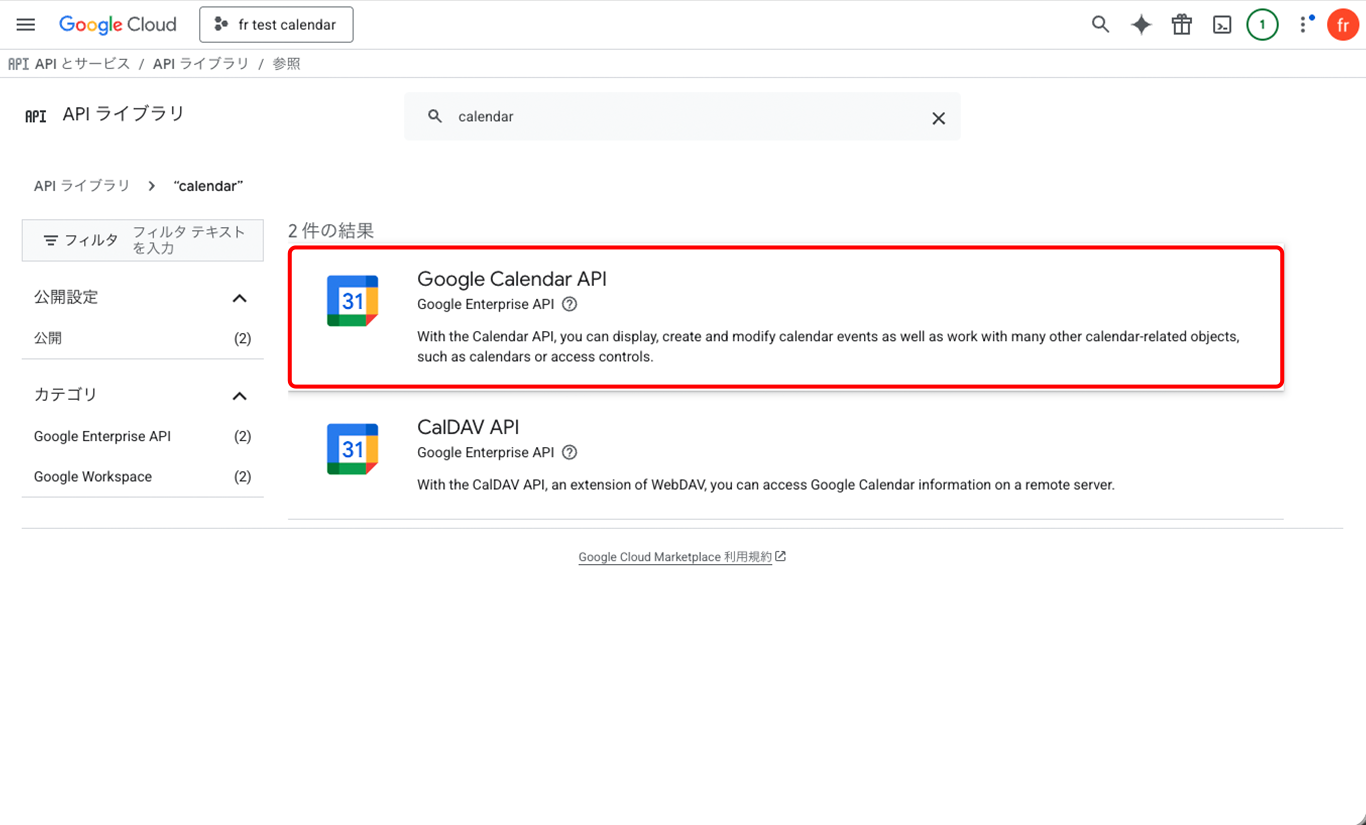
APIライブラリ画面になります。
検索窓に「calendar」と入力します。

Google calendar APIを選択します。
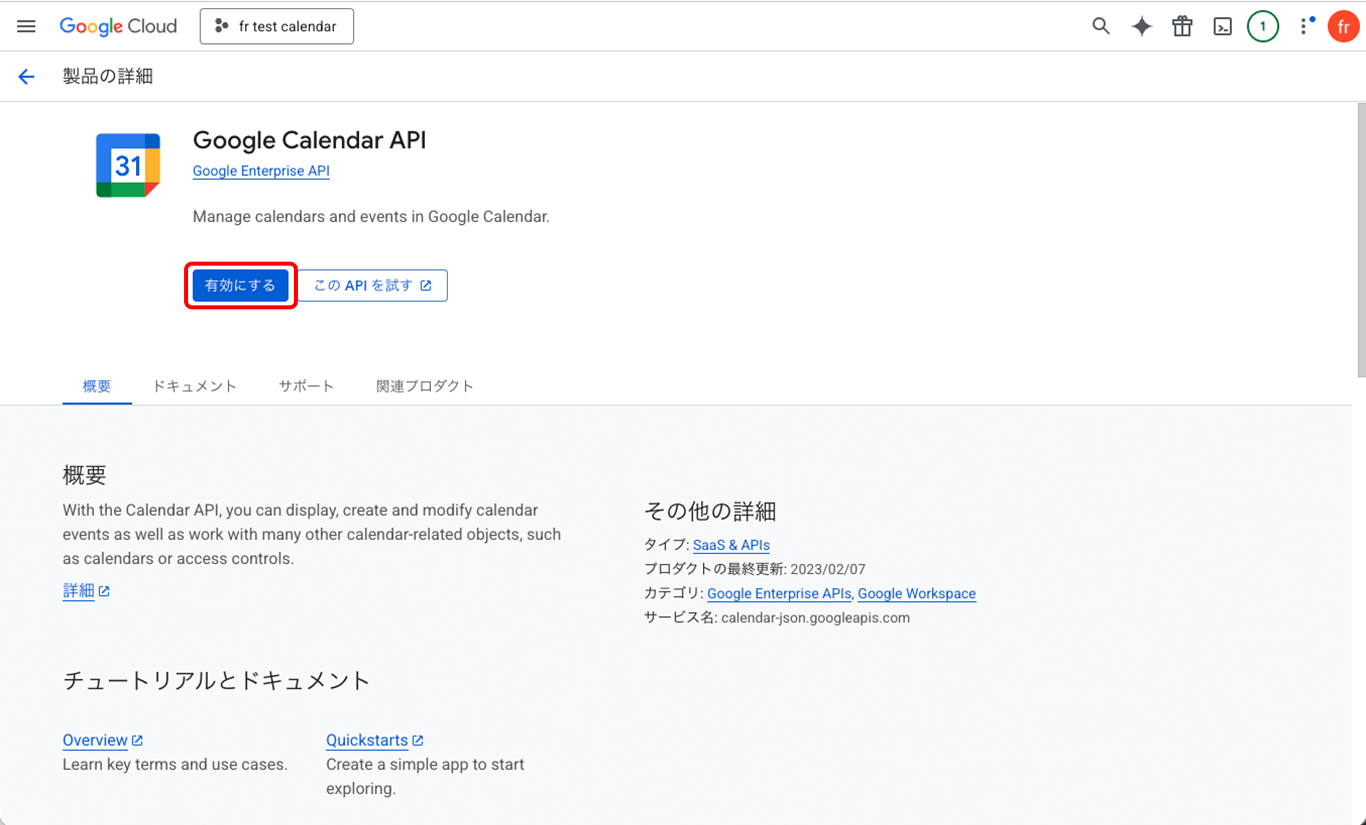
有効にするボタンをクリックします。
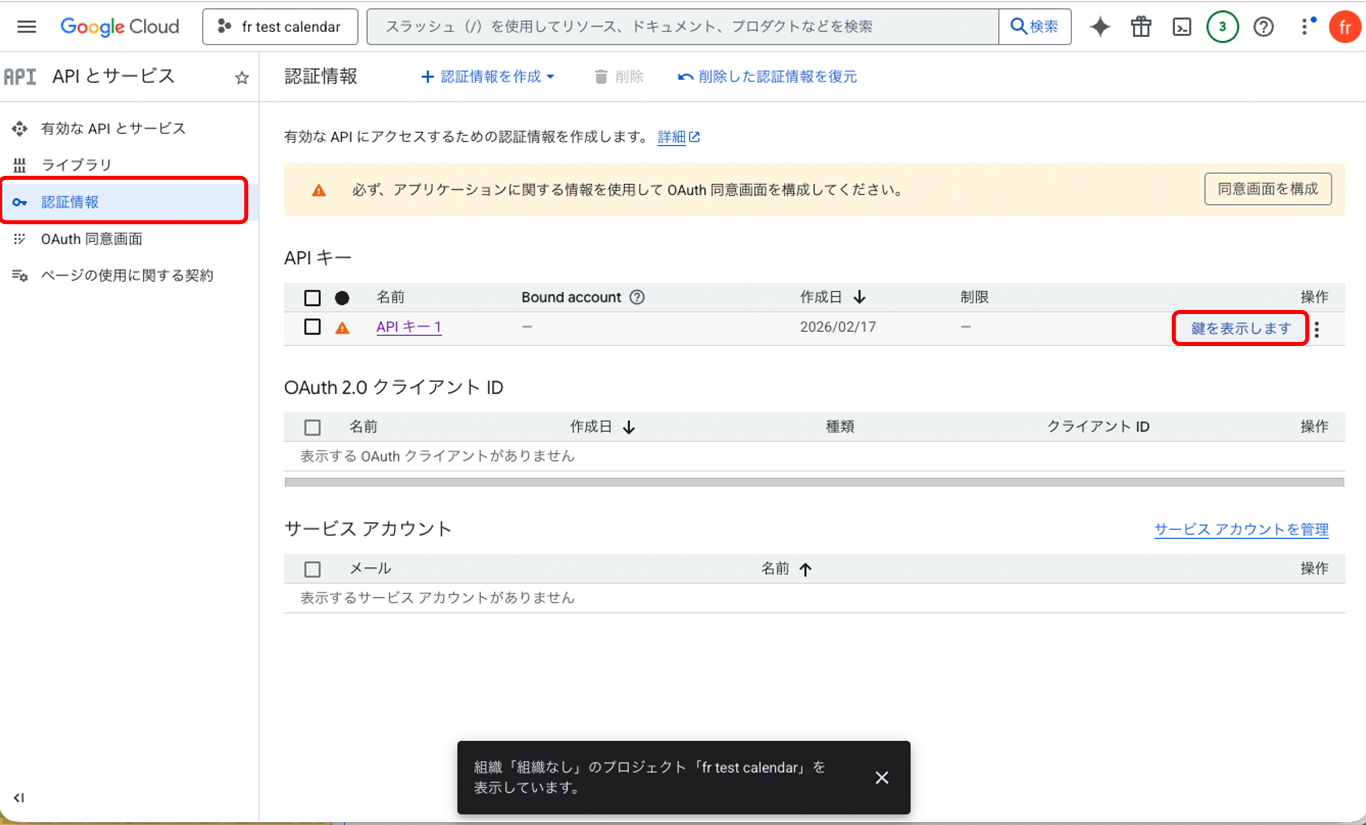
APIとサービス画面に戻ります。
左メニューから認証情報を選択し、
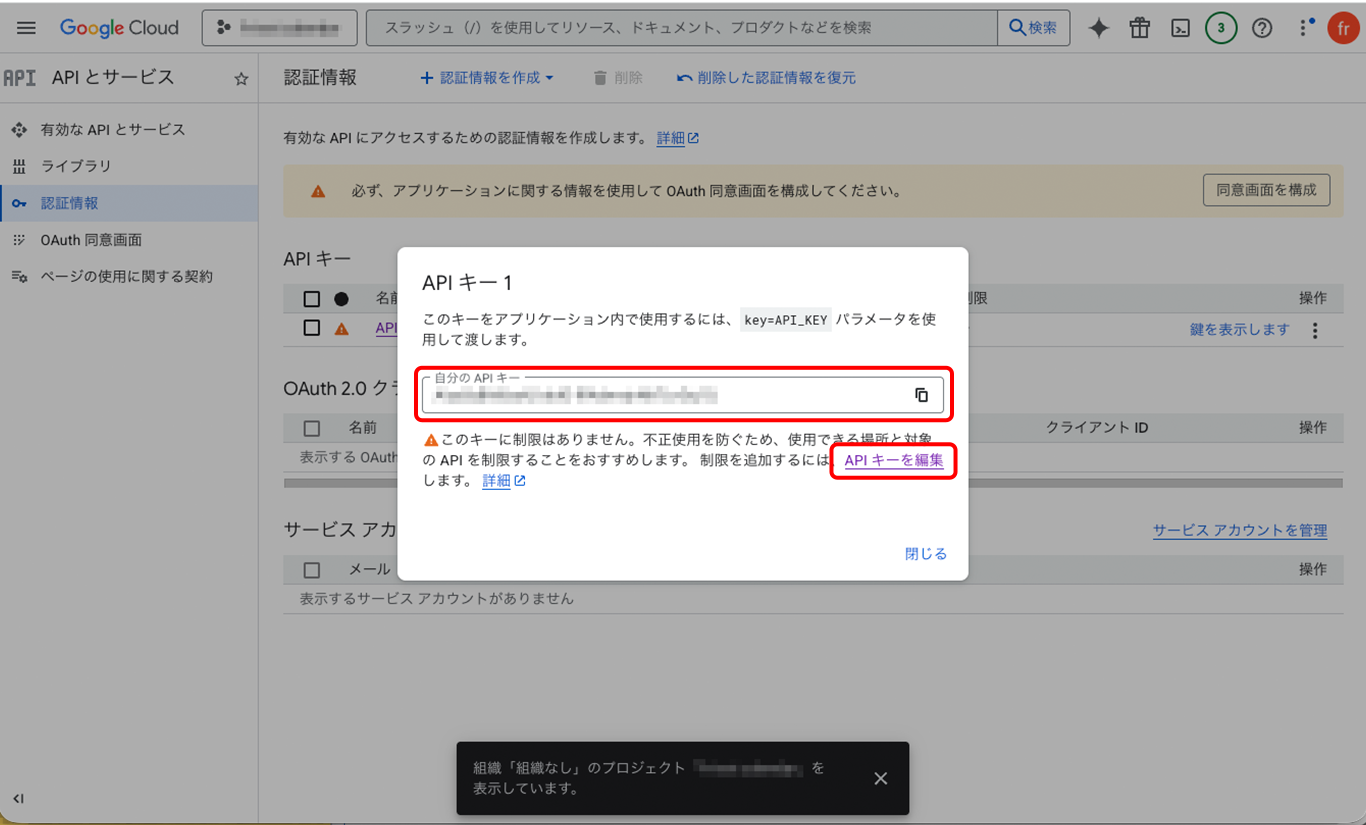
APIキーの右側の鍵を表示しますをクリックします。
APIキーのウインドウが開きます。
自分のAPIキーの内容をコピーします。
下のAPIキーを編集をクリックします。
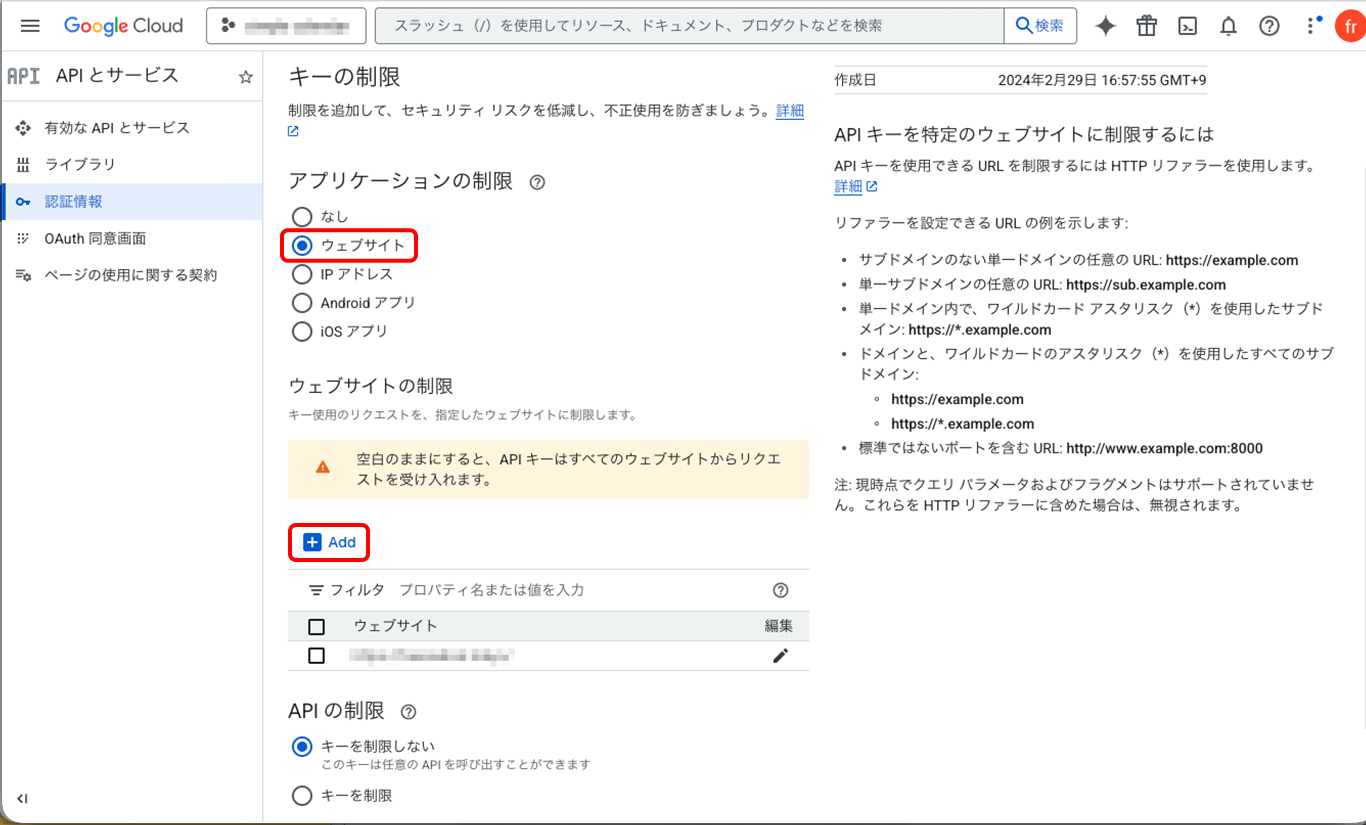
キーの制限画面へ遷移します
アプリケーションの制限のウェブサイトボタンにチェックします。
ウェブサイトの制限の下にある+Addをクリックします。
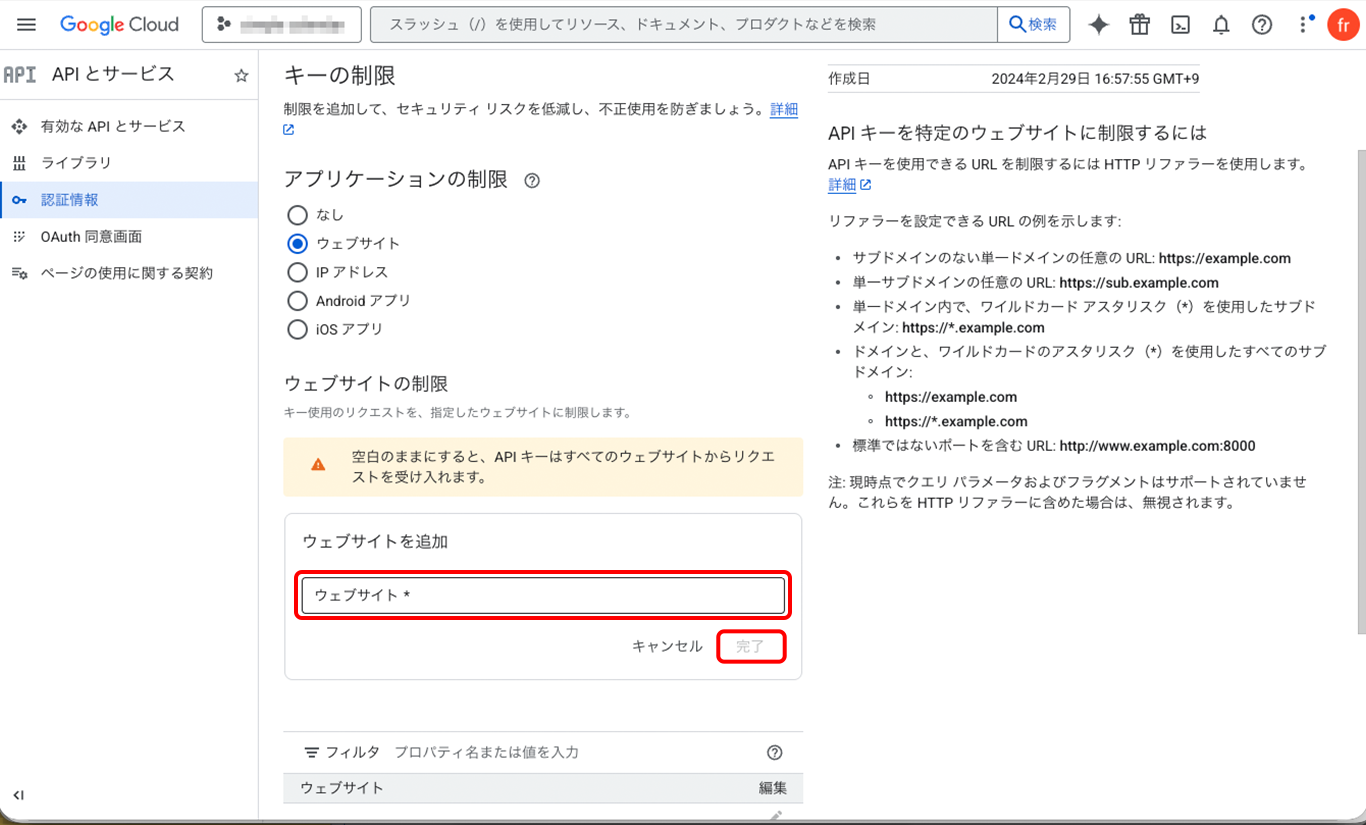
ウェブサイトを追加ウインドウに、
カレンダーを設置するサイトのURLを入力します。
(ページではなくサイトのURLでOK)
右下の完了をクリックし閉じます。
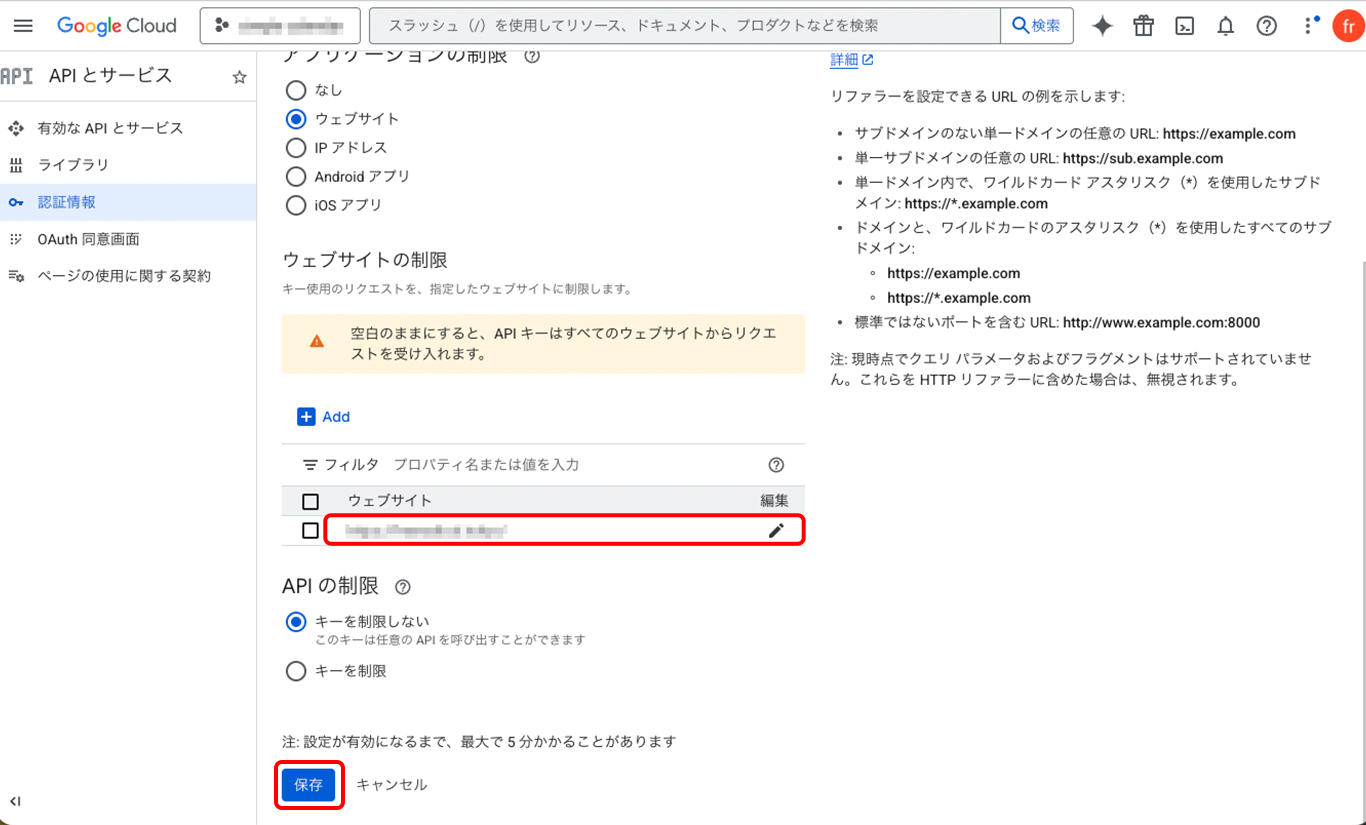
フィルタにウェブサイトが登録されたことを確認し、最下部の保存ボタンをクリックします。
これでWordPressに設置する準備ができました。
Simple Custom CSS and JSの設定
WordPressのダッシュボードに移動します。
テーマファイルのCSSやJSを新規に作成しても良いのですが、今回はプラグインを使用して管理します。
プラグインを使用しない場合は任意の場所にJSとCSSを作成してから、同様の処理を行ってください。
プラグインのインストール
プラグインの新規追加画面でSimple Custom CSS and JS と検索し、
今すぐインストールをクリック。
インストールが済むと現れる有効化ボタンをクリックします。

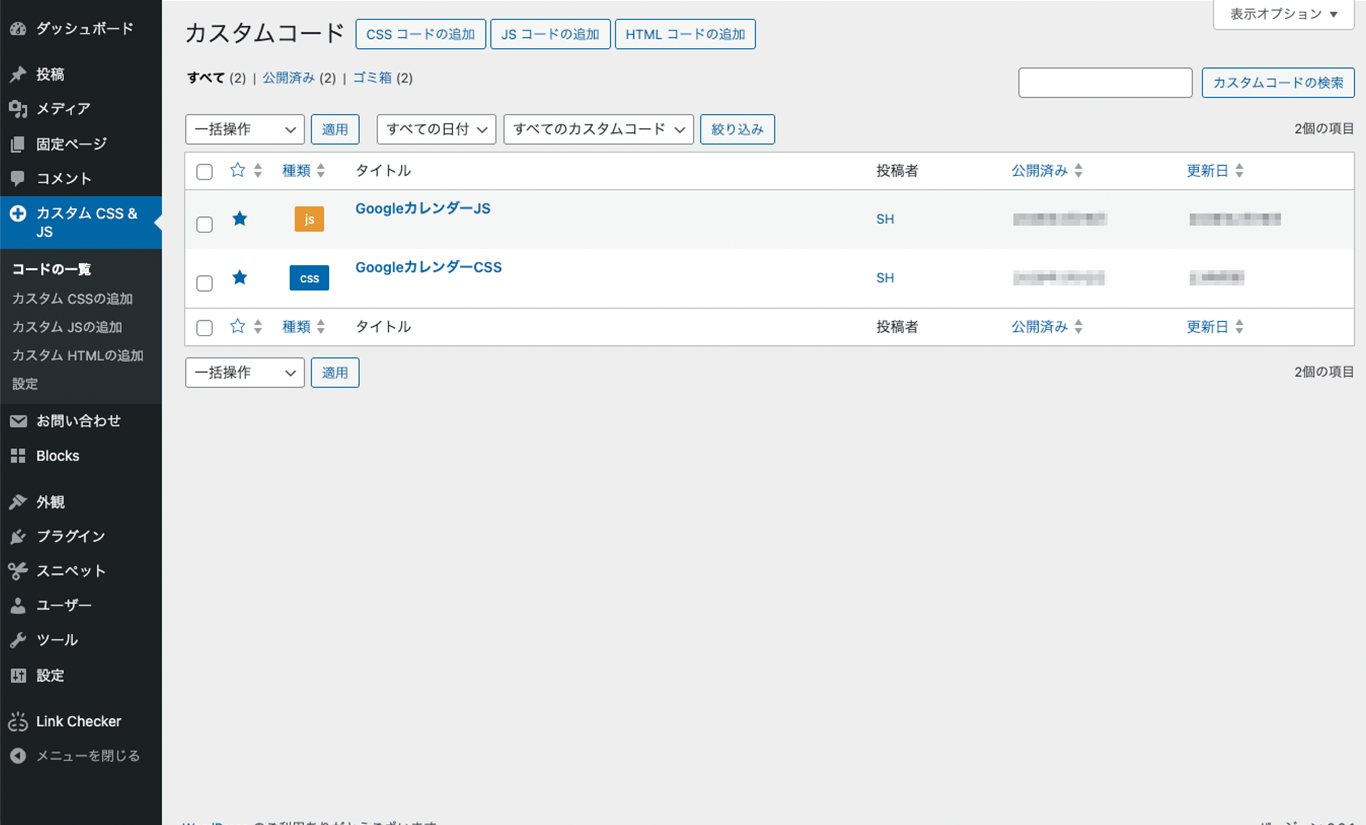
JSの作成
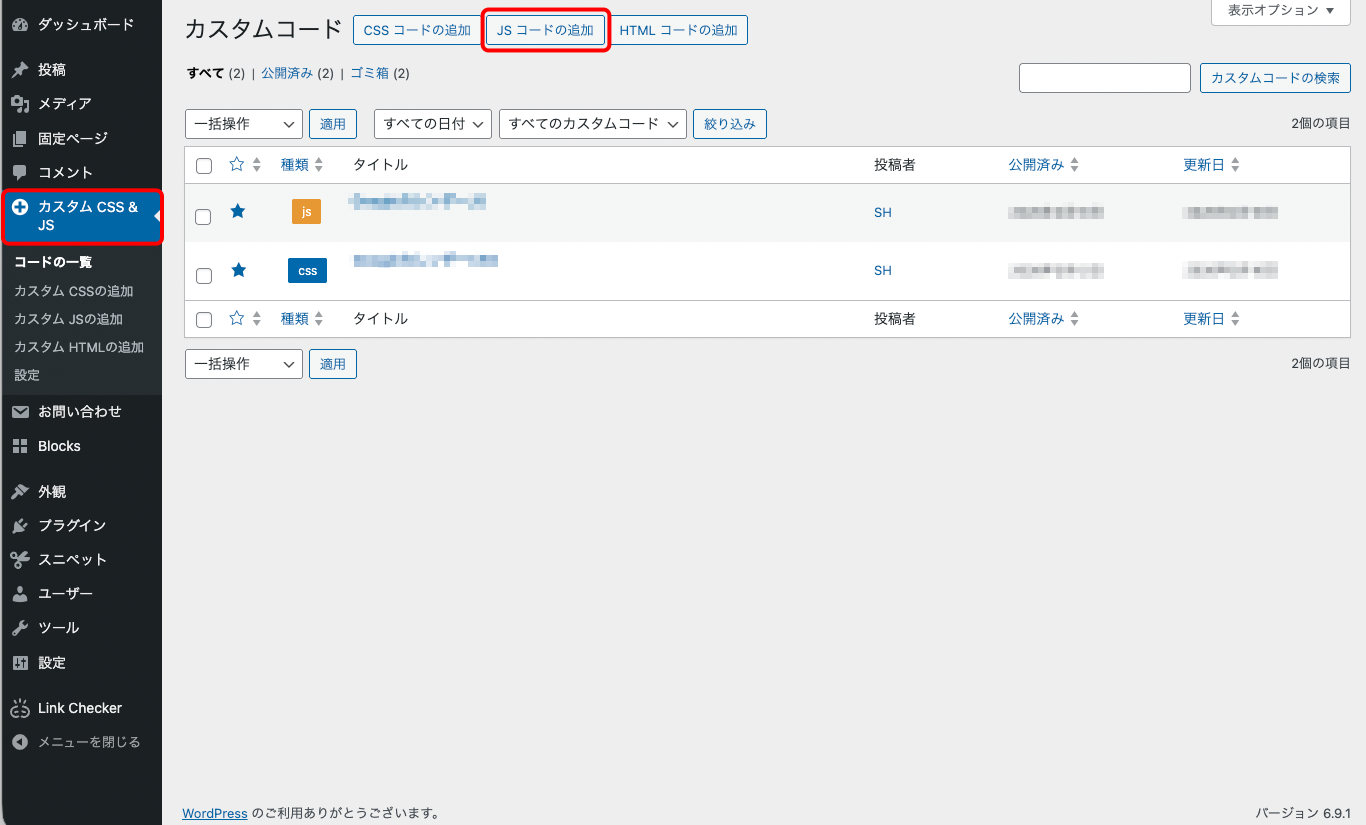
ダッシュボードの左メニューにカスタムCSS&JSが表示されるのでクリックします。
上のメニューボタンからJSコードの追加をクリックします。
JSコードの追加画面が開きます。
タイトルを追加
コードの一覧に表示される名称です。わかりやすいタイトルをつけましょう。日本語OK。
Permalink
Editをクリックしパーマリンク末尾の名称を変更します。英数でカレンダー関連とわかるものにしましょう。
変更したらURLをすべてコピーしておきます。
オプション欄は初期設定のままで大丈夫です。
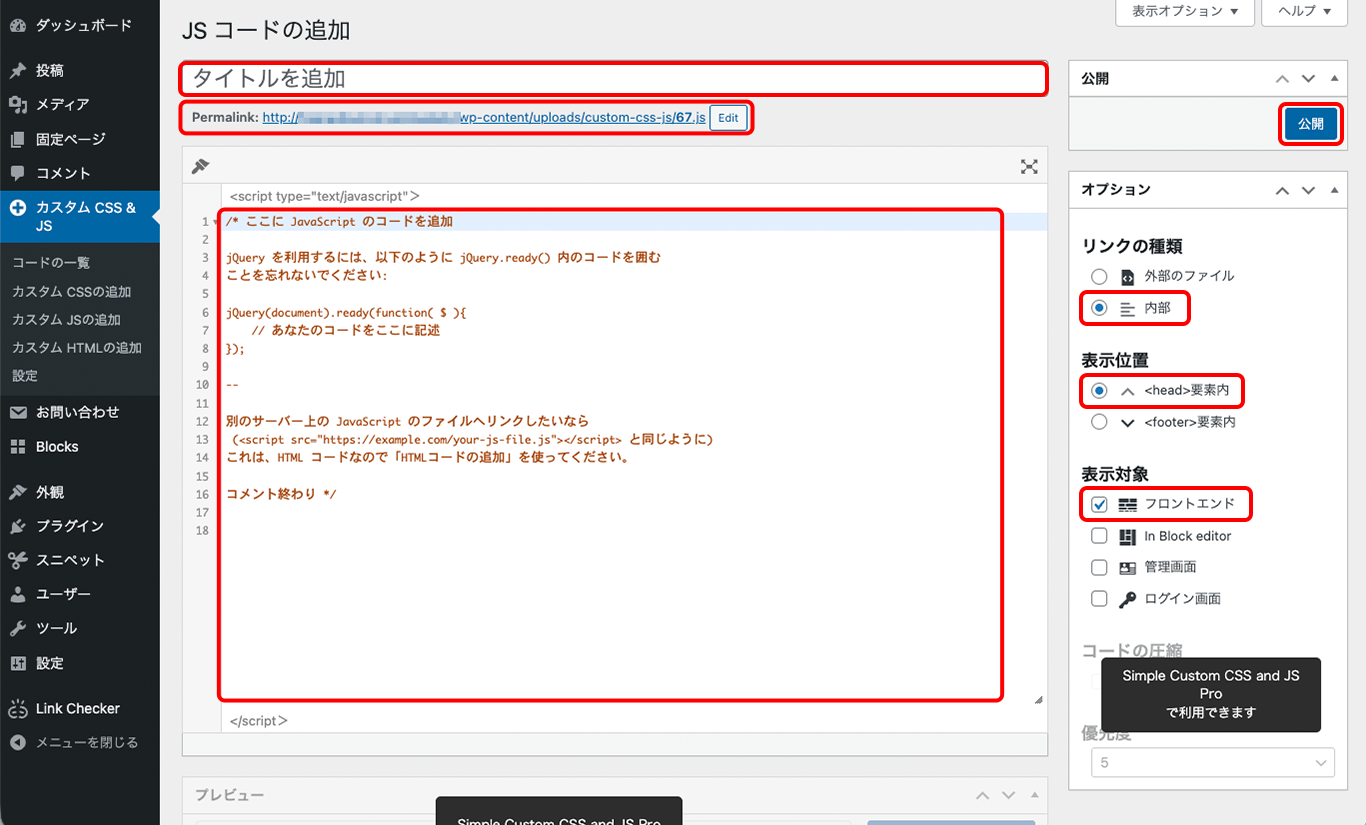
<script type=”text/javascript” >の下
コメントを削除し、右記のコードを貼り付けます。
コード内の/* Googleカレンダーキー */ に
コピーしておいたカレンダーキーと
カレンダーIDを挿入してください。
右上の公開ボタンをクリックしてください。
document.addEventListener('DOMContentLoaded', function () {
 const calendarEl = document.getElementById('calendar');

  // モーダル要素
  const modal        = document.getElementById('fc-modal');
  const modalTitle   = document.getElementById('fc-modal-title');
  const modalDesc    = document.getElementById('fc-modal-desc');
  const modalClose   = document.querySelector('.fc-modal-close');
  const modalOverlay = document.querySelector('.fc-modal-overlay');

  if (!calendarEl || !modal) return;

  /* =================================================
     モーダル制御
  ================================================= */
  function closeModal() {
    modal.style.display = 'none';
  }

  modalClose?.addEventListener('click', closeModal);
  modalOverlay?.addEventListener('click', closeModal);

  /* =================================================
     カレンダー初期化
  ================================================= */
  const calendar = new FullCalendar.Calendar(calendarEl, {

    /* 表示設定 */
    initialView: 'dayGridMonth',
    height: 'auto',
    firstDay: 1,         // 曜始まり
    locale: 'ja',        // 漢字に

    headerToolbar: {
      left: 'prev',
      center: 'title',
      right: 'next'
    },

    // 日付の「日」を消す
    dayCellContent: function (arg) {
      return { html: arg.date.getDate() };
    },

    /* Googleカレンダーキー */
    googleCalendarApiKey: 'APIキー',
    events: {
      googleCalendarId: 'カレンダーID'
    },

    /* =================================================
       イベント描画時
    ================================================= */
    eventDidMount: function (info) {

      const title = info.event.title;
      const el    = info.el;

      // 休業日
      if (title.includes('休業')) {
        el.classList.add('is-closed-event');

        const dayCell = el.closest('.fc-daygrid-day');
        if (dayCell) {
          dayCell.classList.add('is-closed-day');
        }
      }

      // 色分け
      if (title.includes('ポイント')) el.classList.add('event-point');
      if (title.includes('オフ'))       el.classList.add('event-off');
      if (title.includes('イベント'))   el.classList.add('event-fun');

    },


    /* =================================================
       イベントクリック → モーダル表示
    ================================================= */
    eventClick: function (info) {

      // Googleカレンダーへの遷移を止める
      info.jsEvent.preventDefault();

      // 休業日はモーダル表示しない
      if (info.event.title.includes('休業')) return;

      // タイトル
      modalTitle.textContent = info.event.title;

      // 説明文
      modalDesc.textContent =
        info.event.extendedProps.description || '';

      // 表示
      modal.style.display = 'block';
    }

  });


  calendar.render();

});CSSの作成
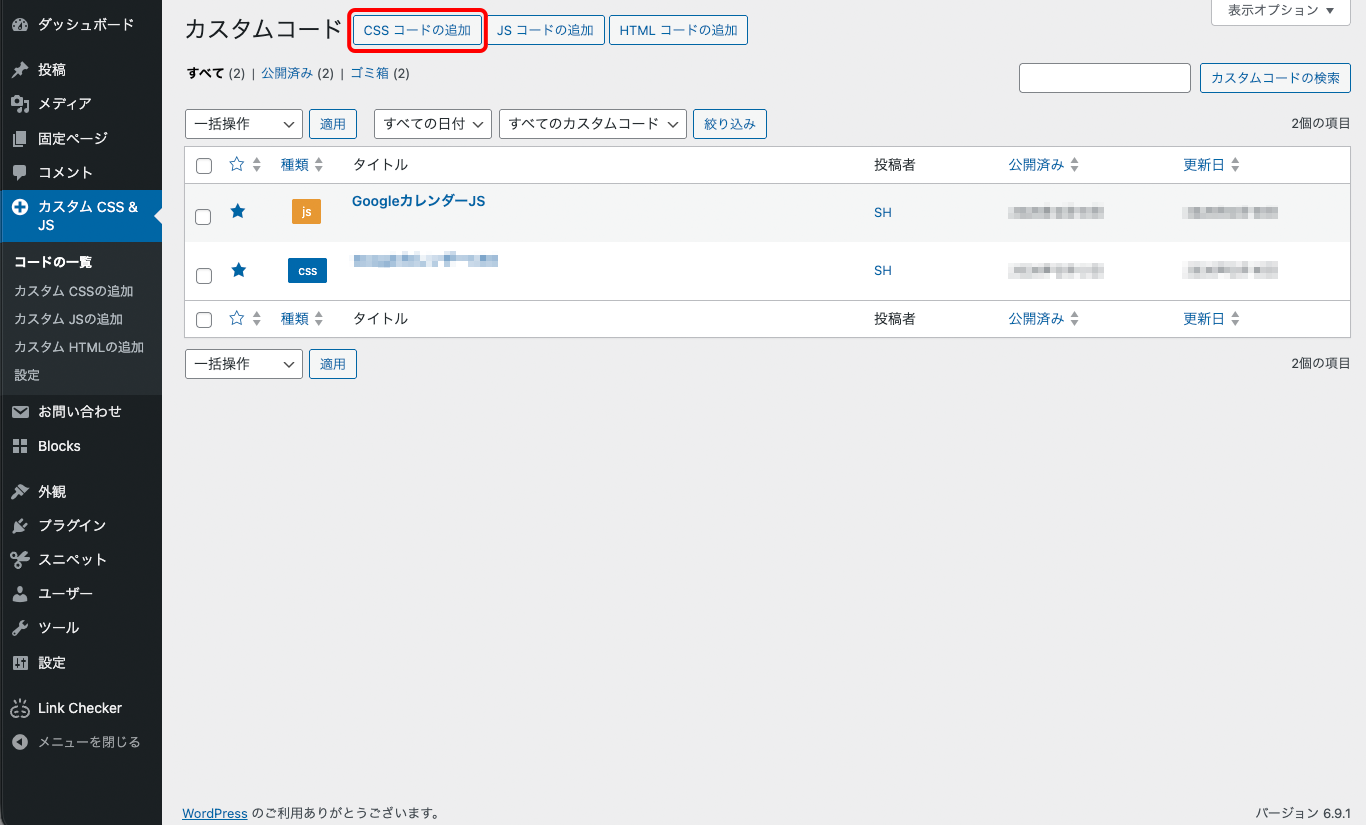
ダッシュボードの左メニューのカスタムCSS&JSをクリックします。
上のメニューボタンからCSSコードの追加をクリックします。
CSSコードの追加画面が開きます。
タイトルを追加
コードの一覧に表示される名称です。わかりやすいタイトルをつけましょう。日本語OK。
オプション欄は初期設定のままで大丈夫です。
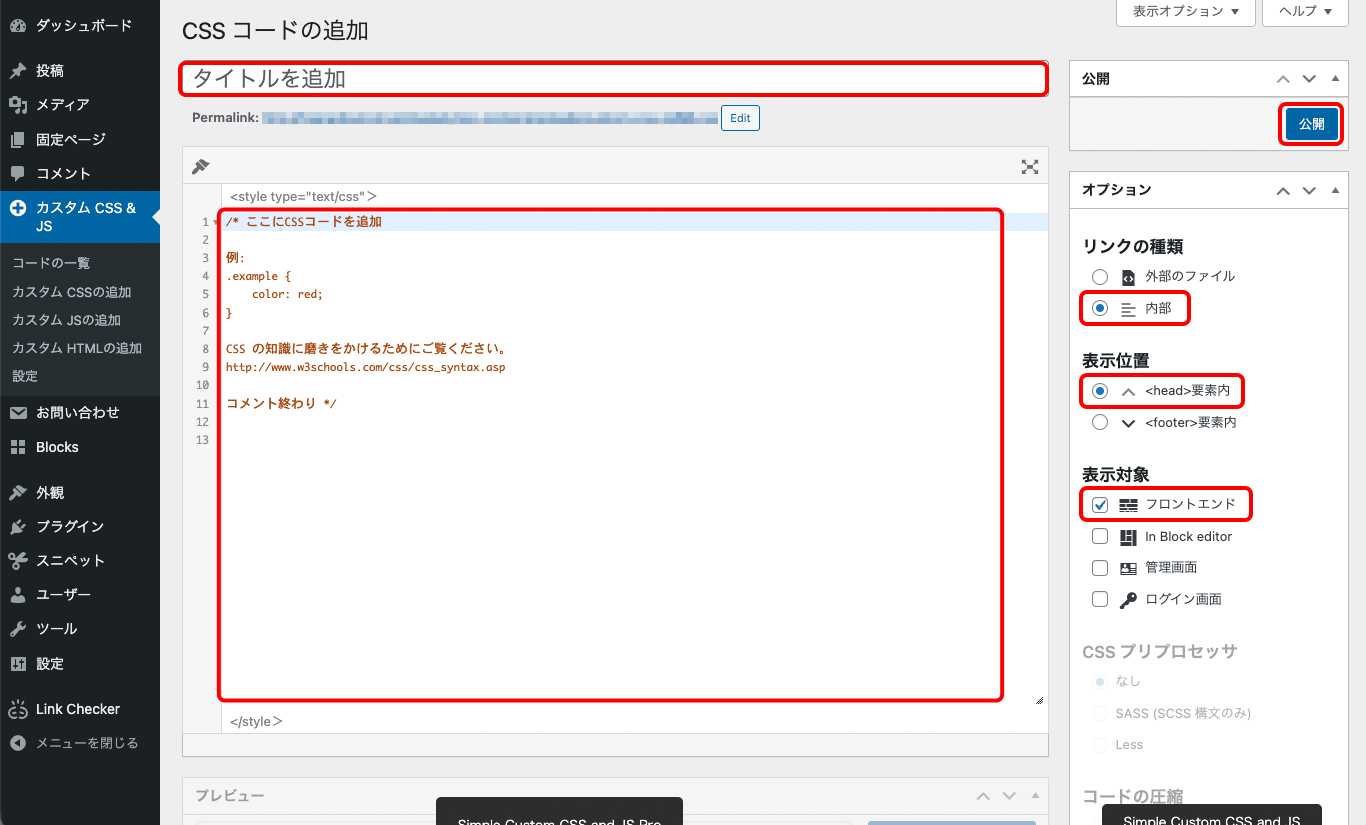
<style type=”text/css”>の下
コメントを削除し、右記のコードを貼り付けます。
右上の公開ボタンをクリックしてください。
/* カレンダータイトル */
h2#fc-dom-1 {
  border: none;
}
/* ツールバー文字色 */
.fc-toolbar-chunk {
  color: #8b5a2b;
}
/* ナビゲーションボタン */
.fc .fc-button-primary {
  background-color: transparent;
  border-color: transparent;
  color: #8b5a2b;
}
.fc .fc-button:hover {
  color: #8b5a2b;
}
/* ボタンhover */
.fc {
  --fc-button-hover-bg-color: transparent;
  --fc-button-hover-border-color: #8b5a2b;
}

/* =================================================
   月表示レイアウト共通
================================================= */

/* 全体枠線 */
.fc .fc-scrollgrid,
.fc .fc-scrollgrid th,
.fc .fc-scrollgrid td {
  border: 2px solid #8b5a2b;
}
/* 曜日ヘッダー */
.fc .fc-col-header-cell {
  background-color: #8b5a2b;
}
.fc .fc-col-header-cell-cushion {
  color: #ffffff;
  font-weight: bold;
}
/* 今月セル */
.fc .fc-daygrid-day:not(.fc-day-other) {
  background-color: #fff8dc;
}
/* 今日セル */
.fc-daygrid-day.fc-day-today {
  background-color: #ffbbb6 !important;
}
/* 今日 + 休業日 */
.fc-daygrid-day.fc-day-today.is-closed-day {
  background-color: #ffbbb6 !important;
}
/* 日付位置・色 */
.fc .fc-daygrid-day-top {
  display: flex;
  justify-content: flex-start !important;
  align-items: flex-start;
}
.fc .fc-daygrid-day-number {
  margin-left: 0 !important;
  margin-right: auto !important;
  font-weight: 600;
  color: #8b5a2b;
}

/* =================================================
   イベント表示
================================================= */

/* イベント帯中央寄せ */
.fc-daygrid-event {
  display: flex !important;
  align-items: center !important;
  justify-content: center !important;
  text-align: center !important;
}
/* 色分け */
.event-point {
  background-color: #ff4d6d !important;
  border: none;
  font-weight: 600;
  border-radius: 4px;
}
.event-off {
  background-color: #ffc60b !important;
  border: none;
  font-weight: 600;
  border-radius: 4px;
}
.event-off .fc-event-title {
  color: #333 !important;
}
.event-fun {
  background-color: #4cc9f0 !important;
  border: none;
  font-weight: 600;
  border-radius: 4px;
}

/* =================================================
   休業日
================================================= */

.fc-daygrid-day.is-closed-day {
  background-color: #a8a098 !important;
}
.fc-h-event.is-closed-event {
  background: transparent !important;
  border: none !important;
  box-shadow: none !important;
  pointer-events: auto !important;
}
.fc-h-event.is-closed-event .fc-event-title {
  color: #ffffff !important;
  text-align: center;
}

/* =================================================
   PC表示
================================================= */

.fc .fc-daygrid-day {
  height: auto !important;
  min-height: 5.5em;
}
.fc .fc-daygrid-day-frame {
  padding: 6px !important;
}
.fc .fc-daygrid-event {
  margin: 3px 0 !important;
  padding: 4px 6px !important;
  font-size: 0.75rem;
}
.fc .fc-daygrid-day-number {
  font-size: 0.85rem;
  line-height: 1.4;
}

/* =================================================
   スマホ表示
================================================= */

@media (max-width: 600px) {

  .fc .fc-daygrid-day-frame {
    padding: 1px !important;
  }
  .fc .fc-daygrid-event {
    font-size: 0.5rem!important;
    white-space: nowrap;
    overflow: hidden;
    text-overflow: ellipsis;
  }
  .fc .fc-event-title {
    overflow: hidden;
    text-overflow: ellipsis;
  }
  .fc .fc-daygrid-day-number {
    font-size: 0.8rem;
  }
}

/* =================================================
   モーダル
================================================= */

.fc-modal {
  display: none;
  position: fixed;
  inset: 0;
  z-index: 9999;
}
.fc-modal-overlay {
  position: absolute;
  inset: 0;
  background: rgba(0, 0, 0, 0.5);
}
.fc-modal-content {
  position: relative;
  max-width: 360px;
  margin: 15vh auto;
  background: #ffffff;
  border-radius: 10px;
  padding: 20px;
  box-shadow: 0 10px 30px rgba(0, 0, 0, 0.2);
}
.fc-modal-close {
  position: absolute;
  top: 8px;
  right: 10px;
  border: none;
  background: none;
  font-size: 22px;
  cursor: pointer;
}
#fc-modal-title {
  margin: 0 0 8px;
  font-size: 1.3rem;
}
#fc-modal-desc {
  font-size: 1rem;
  line-height: 1.5;
}
Googleカレンダー用のJSとCSSが作成できました。
(名称は一例です)
function.phpの設定
テーマファイルエディターの設定
ダッシュボードの左メニューから
外観
テーマファイルエディターを選択、
編集するテーマを選択から子テーマを選択、
functions.phpをクリックします。
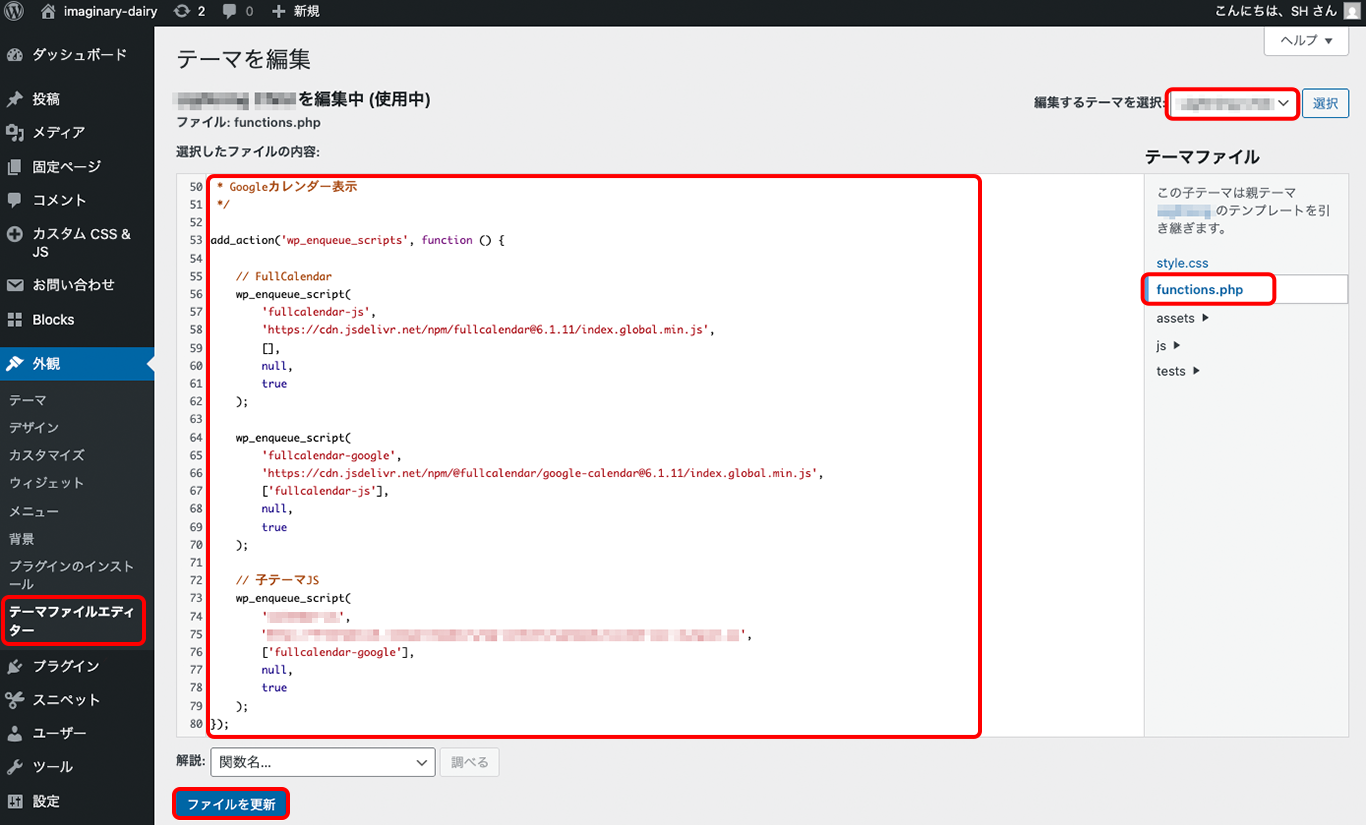
選択したファイルの内容の最下部に
右記のコードを貼り付けます。
コード内の// JS に
コピーしておいたJSのパーマリンクの末尾-jsと
パーマリンクすべてを挿入してください。
左下のファイルを更新ボタンをクリックしてください。
// Googleカレンダー(FullCalendar)
add_action('wp_enqueue_scripts', function () {

    // -----------------------
    // FullCalendar CSS
    // -----------------------
    wp_enqueue_style(
        'fullcalendar-css',
        'https://cdn.jsdelivr.net/npm/fullcalendar@6.1.11/index.global.min.css'
    );

    // -----------------------
    // FullCalendar JS
    // -----------------------
    wp_enqueue_script(
        'fullcalendar-js',
        'https://cdn.jsdelivr.net/npm/fullcalendar@6.1.11/index.global.min.js',
        [],
        null,
        true
    );

    // -----------------------
    // Google Calendar プラグイン
    // -----------------------
    wp_enqueue_script(
        'fullcalendar-google',
        'https://cdn.jsdelivr.net/npm/@fullcalendar/google-calendar@6.1.11/index.global.min.js',
        ['fullcalendar-js'],
        null,
        true
    );

    // -----------------------
    //  JS
    // -----------------------
    wp_enqueue_script(
        'パーマリンク末尾-js',
        'パーマリンクすべて',
        ['fullcalendar-js', 'fullcalendar-google'],
        null,
        true
    );
});
設置ページの設定
固定ページのカレンダーを設置したい場所に
カスタムHTMLブロックを挿入し、
右記のコードを入れます。
<div id="calendar"></div>

<div id="fc-modal" class="fc-modal">
  <div class="fc-modal-overlay"></div>
  <div class="fc-modal-content">
    <button class="fc-modal-close">×</button>
    <p id="fc-modal-title"></p>
    <p id="fc-modal-desc"></p>
  </div>
</div>
デザインの設定
カレンダーを設置した固定ページをプレビューします。
表示例とまったく同じデザインで表示されているはずなので、ここからカスタマイズしていきます。
JSとCSSで調整します。
JSの// 色分け
if (title.includes(‘ポイント‘)) el.classList.add(‘event-point’);
「ポイント」という文字列が含まれていると「event-point」タグが付くように設定されているので
任意の文字列とタグに変更します。
例)ポイント→特売日 event-point→event-tokubai など
「オフ」「イベント」も同様に、任意の文字に変更するか、不要なら削除します。
CSSの/* 色分け */ に
「event-point」タグの設定が記載されているので、JSで変更した文字列に置き換え、色などのスタイルを変更します。
「event-off 」「event-fun」も同様に、任意の文字に変更してスタイルを調整するか、不要なら削除します。
JSの// 休業日
if (title.includes(‘休業‘)) {
el.classList.add(‘is-closed-event‘);
「休業」という文字列が含まれていると「is-closed-event」タグが付くように設定されているので
任意の文字列に変更します。
例)休業→店休
CSSの/* ===休業日=== */ に
「is-closed-event」タグの設定が記載されているので、色などのスタイルを変更します。
さらに、「休業」という文字列が含まれている場合、モーダルウィンドウが発動しない設定になっています。
「休業」文字列に変更を加えた場合は、
JSの// 休業日はモーダル表示しない 部分の「休業」文字列も変更します。
また、モーダルウィンドウを発動したい場合はこの箇所を削除します。
JSの/* 表示設定 */
firstDay: 1, // 曜始まり 現在は月曜始まりなので、1→0にすると日曜始まりのカレンダーになります。
locale: ‘ja‘, // 漢字に 削除すると曜日表記やヘッダーが英語表記になります。
コメントで内容を記載しているので参考にして、お好みの色や大きさに変更してください。
完成
CSSとJSをカスタマイズし、サイトの雰囲気に合ったカレンダーに仕上がったでしょうか。
これで解説は終了です。おつかれさまでした。
CONTACT
専門知識や独自ノウハウを持つ
株式会社フリーラジカルに
まとめてお任せください